Basis
Load UI package
There are several ways to load a UI package into a Unity project. Developers can choose one or more of them to mix and match according to the needs of the project:
-
Publish the packaged files directly to Unity's Resources directory or its subdirectories,
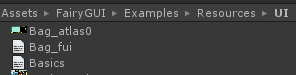
For UI packages processed in this way, if you use UIPanel to display the UI, you do not need any code to load the package, and UIPanel will automatically load it; if you create the UI dynamically, you need to use code to load the package:
// demo is the file name filled in when publishing
UIPackage.AddPackage ("demo");
// if in a subdirectory UIPackage.AddPackage ("path/demo");
// If you do not put it in Resources or its subdirectories, you can pass in the full path, but this method can only be used in Editor UIPackage.AddPackage ("Assets/SomePath/Package1");
AddPackage will first use the passed path as the key for detection. If the package has already been added, it will not be added repeatedly.

2. Package the published file into two AssetBundles, that is, the definition file and the resources are packaged into a bundle (desc_bundle + res_bundle). The advantage of this is that the general UI update is to modify the position of the component, and does not involve the update of image resources. Then you only need to repackage and push desc_bundle. You do not need to let players update the res_bundle, which is usually relatively large, and save traffic. The packager is implemented by the developer in a manner familiar to him. Take demo as an example, please follow these rules to package:
- demo_fui.bytes is packaged separately as desc_bundle;
- Other resources (demo_atlas0.png, etc.) are packaged into res_bundle.
UI packages processed this way must be loaded using code:

```csharp
// desc_bundle and res_boundle are loaded by the developer.
 UIPackage.AddPackage (desc_bundle, res_bundle);
In this way AddPackage, there is no re-ranking detection mechanism, you need to guarantee it yourself.
-
Package the published file into an AssetBundle. The packager is implemented by the developer in a manner familiar to him. Take demo as an example, put demo_fui.bytes and other resources (demo_atlas0.png, etc.) into the bundle.
UI packages processed this way must be loaded using code:
// Bundle loading is implemented by the developer.
UIPackage.AddPackage (bundle);
In this way AddPackage, there is no re-ranking detection mechanism, you need to guarantee it yourself.

## Uninstall UI pack

When a package is no longer used, it can be uninstalled.

```csharp
// Here you can use the package id, package name, and package path.
    UIPackage.RemovePackage ("package");
After the package is uninstalled, all the resources such as textures contained in the package will be uninstalled, and the components created in the package will not display properly (although no error will be reported), so these components should (or have been) destroyed. Frequent loading and unloading of packages is generally not recommended, because each loading and unloading must consume CPU time (meaning power consumption) and generate a lot of GC. The memory occupied by the UI system can be accurately estimated. You can set which packages are resident in memory according to the frequency of use of the packages (as much as possible is recommended).
Package memory management
-
AddPackage only loads resources such as textures and sounds when used. If you need to load all in advance, call
UIPackage.LoadAllAssets。 -
If UIPackage is loaded from AssetBundle, AssetBundle will be Unloaded (true) when RemovePackage is removed. If you confirm that all resources have been loaded (for example, LoadAllAssets is called), you can also uninstall AssetBundle yourself. If your ab is managed by yourself and you don't want FairyGUI to do any processing, you can set
UIPackage.unloadBundleByFGUIIs false. -
transfer
UIPackage.UnloadAssetsYou can only release the resources of the UI package without removing the package, and there is no need to uninstall the UI interface created from the UI package (you can still call and display these interfaces without error, but the image is blank). When the package needs to be resumed, callUIPackage.ReloadAssetsRestore resources. Those UI interfaces created from this UI package can automatically resume normal display. If the package is loaded from AssetBundle, then AssetBundle will be Unload (true) when UnloadAssets, so when ReloadAssets, you must call ReloadAssets with a parameter overload and provide a new AssetBundle instance.
UIPanel
There are two ways to use the editor-made interface in Unity. The first is to use UIPanel.
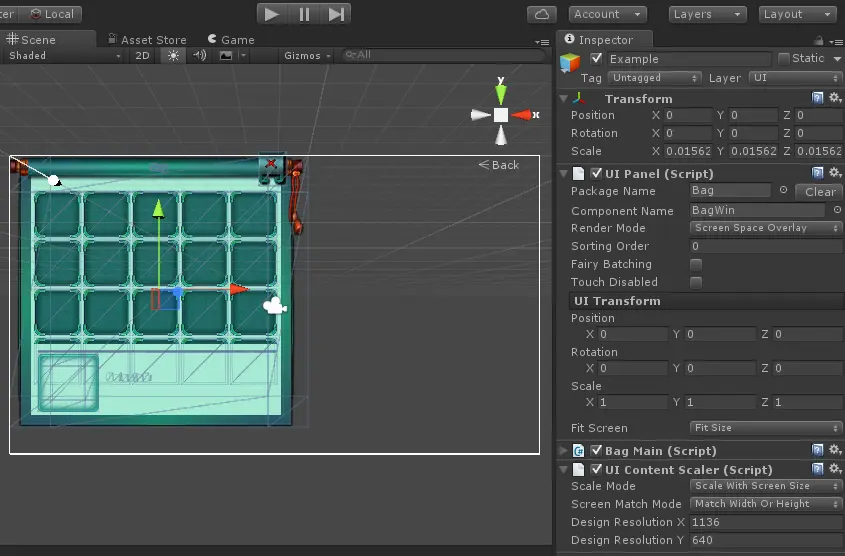
It only takes 3 steps to put the interface made in the editor into the scene of Unity.
- Select FairyGUI-> UIPanel from the GameObject menu:
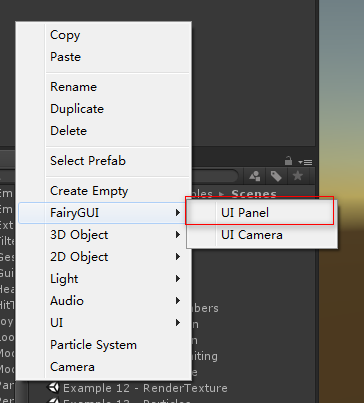
- Click PackageName or ComponentName in the Inspector. A window for selecting components will pop up:
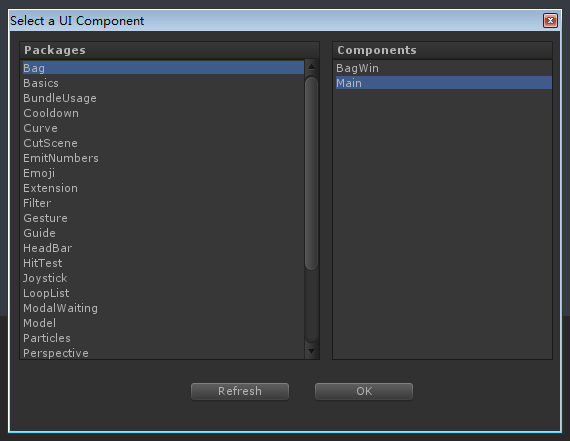
- This window lists all UI packages that can be found in the project. Select a package and component and click OK. (If you can't find your UI package here, you can try clicking Refresh).
As you can see, the content of the UI component is displayed. (Note: Unity4 currently does not support displaying content, only wireframes can be displayed)
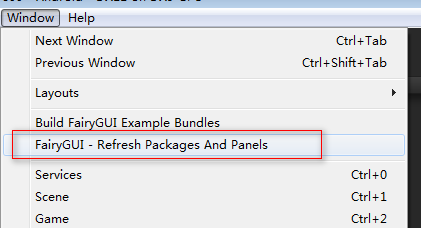
If the UI package is modified, or some other conditions cause the UIPanel to display abnormally, you can use the following menu to refresh:
When running, the way to get the UIPanel UI is:
UIPanel panel = gameObject.GetComponent<UIPanel>();
    GComponent view = panel.ui;
UIPanel will be destroyed when the GameObject is destroyed (manually destroyed or over the scene)
UIPane only saves the name of the UI package and the name of the component. It does not make any reference to textures or other resources, that is, the resources used by the UI will not be included in the scene data.
In the edit state, no matter which UI package resources are referenced by the UI component, including those placed in the Resources directory and those not placed under Resources, they can be displayed correctly. However, when running, UIPanel can only automatically load UI packages placed in the Resources directory or its subdirectories. It will also only load the UI packages in which it is located. In other cases, UI packages such as referenced UI packages or AssetBundle UI package) cannot be loaded automatically。 You need to use UIPackage.AddPackage to prepare such UI packages before UIPanel is created. UIPanel creates a UI interface when the Start event or the UIPanel.ui property is accessed for the first time. You still have the opportunity to complete these operations in Awake.
Here are some properties of UIPanel:
-
Package NameThe package name where the UI component is located. Note that this just saves a name and does not actually reference any UI data. -
Component NameThe name of the UI component. Note that this just saves a name and does not actually reference any UI data. -
Render ModeThere are three types:Screen Space OverlayThe default value indicates that the UI is displayed in screen space. At this time, the Scale of the Transform will be locked, and it is not recommended to modify other contents of the Transform (keep them to 0). If you want to modify the position of the panel on the screen, use UI Transform (refer to the description of UI Transform below).Screen Space CameraIndicates that this UI is displayed in screen space, but does not use FairyGUI's default orthogonal camera, but uses the specified orthogonal camera.World SpaceIndicates that this UI is displayed in world space and is rendered by a perspective camera. Use the scene's main camera by default. If not, set Render Camera. When using this mode, use Transfrom to modify the UI's position, zoom, and rotation in world space. But you can still use UI Transform.
Note: Render Mode only defines the way FairyGUI treats this UI, which is usually coordinate-related operations (such as click detection, etc.), but has nothing to do with rendering. Which camera the UI renders is determined by the layer of the GameObject. So if you find that the UI is not displayed, you can check whether the layer of the GameObject is correct. For example, if it is Screen Space, GameObject should be in the UI layer, if it is WorldSpace, it should be in the Default layer or other custom layers.
-
Render CameraCan be set when Render Mode is Screen Space Camera or World Space. If not set, it defaults to the main camera of the scene. Note that when RenderMode is WorldSpace, if there is no camera set here, then there must be a main camera in the scene, otherwise the UI cannot be clicked. -
Sorting OrderAdjust the display order of UIPanel. The larger the display is, the more advanced. -
Fairy BatchingWhether to enable Fairy Batching. Please refer to Fairy BatchingDrawCall optimization。 Switching this value, you can see the changes of DrawCall in real time in the edit mode (click the game after switching, the content displayed in Stat will be updated), which can make it easier for you to decide whether to enable this technology. -
Touch DisabledWhen checked, click detection will be turned off. This UI can be ticked when there is no interactive content to improve the performance of click detection. For example, these types of UI can be checked. -
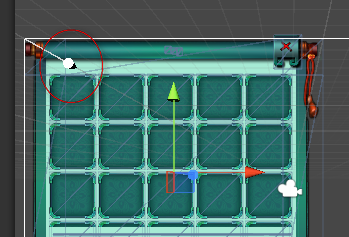
UI TransformWhen Render Mode is Screen Space, you can use this setting to adjust the position of the UI on the screen. You can still adjust the UIPanel's Transform to change the position of the UI, but I don't recommend you do this, because the coordinate position in the Transform is not adaptively adjusted at different resolutions. When Render Mode is World Space, it is recommended to use Transform to set the position of the UI. You can still adjust the UIPanel's Transform to change the position of the UI, but the effect of the adjustment may not be so intuitive. At the same time, you can use the origin shown in the Scene view to adjust the position property of the UI Transform:
Fit ScreenHere you can set the UIPanel adaptation screen.Fit SizeThe UI will fill the screen.Fit Width And Set MiddleThe UI will fill the screen horizontally and then center up and down.Fit Height And Set CenterThe UI will fill the screen vertically, then center it left and right.
There are not many options provided here, because FairyGUI recommends the overall design in the FairyGUI editor, rather than placing small components in Unity. For example, if you need different UI layouts at various positions on the screen, you should create a full-screen component in the FairyGUI editor, then place each sub-component inside, and then use the relation to control the layout; finally, place this full-screen component in Unity Just set the Fit Screen to Fit Size. The wrong way is to put each sub-component in Unity and then lay it out.
-
HitTest ModeHere you can set how the UIPanel handles mouse or touch events.DefaultThis is the default way. FairyGUI uses built-in mechanisms to detect mouse or touch actions. It does not use rays, and UIPanel does not need to create collision objects, which is more efficient.RaycastIn this way, UIPanel will automatically create a collision volume and use ray mode for click detection. This method is suitable for situations where UIPanel also needs to interact with other 3D objects. For UIPanels set up for click testing with Raycast, you can use HitTestContext.layerMask to exclude some layers that you don't care about.
-
Set Native Children OrderYou can directly hang other 3D objects under the UIPanel object, such as models, particles, etc. (note that their layer is the same as that of the UIPanel), and then check this option to enable these 3D objects to be displayed on the UIPanel level. Equivalent to inserting external 3D objects into the UI hierarchy. However, these 3D objects can only be displayed on the contents of this UIPanel, and cannot be interspersed with the contents of this UIPanel. Generally, this function is used to make special effects used in the UI, which is convenient for viewing the final display results, and can also be used to observe the adjustment of the model's zoom factor under the UI camera.
Create UIPanel dynamically
UIPanel can also be created in the game, dynamically attaching the UI interface for any game object, for example:
// The life cycle of UIPanel will be consistent with yourGameObject. Again, pay attention to the layer of yourGameObject.
    UIPanel panel = yourGameObject.AddComponent <UIPanel> ();
    panel.packageName = "package name";
    panel.componentName = "component name";

    // The following is not necessary to set the options. Note that many properties must be set on the container, not the UIPanel.

    // The way to set renderMode
    panel.container.renderMode = RenderMode.WorldSpace;

    // The way to set renderCamera
    panel.container.renderCamera = ...;

    // The way to set fairyBatching
    panel.container.fairyBatching = true;

    // Set the sorting order
    panel.SetSortingOrder (1, true);

    // The way to set hitTestMode
    panel.SetHitTestMode (HitTestMode.Default);

    // Finally, create the UI
    panel.CreateUI ();
UIPanel sorting
The display order of UIPanel on the screen is determined by his sortOrder property. The larger the sortingOrder is, the more it is displayed (closer to the screen). But the ordering here refers to the UIPanel under the same camera. If two UIPanels are rendered by different cameras, their display level is first determined by the depth of the camera (Depth), and UIPanels with larger rendering cameras must be displayed in front.
For UIPanel with RenderMode of ScreenSpace, in particular, 1000 is a special level, which represents the display level of 2D UI (GRoot), that is, UIPanel with sorting order greater than 1000 will be displayed on top of 2D UI, and those less than 1000 are displayed Below the 2D UI.
For a UIPanel with RenderMode of WorldSpace, which is what we often say 3D UI (for example, a blood bar above the head), if you want to sort by z value instead of sortOrder value, you can first set the sortOrder of this type of UIPanel to the same Value, such as 100, and then call:
// Sort UIPanels with a sorting order of 100 by z. The smaller the z value, the higher the display.
    Stage.inst.SortWorldSpacePanelsByZOrder (100);
This method has a sorting cost of List.Sort. It is not recommended to call it every frame. It can be called after a period of time or after the position of the object changes.
About HUD
UIPanel can be used to make blood strips overhead. To be careful of:
- A UIPanel placed on a 3D object cannot be merged with other UIPanels by DrawCall, so if there are many characters on the same screen, the DC is very high. This cannot be avoided. If you must merge DCs, use 2D UI instead, put these HUD objects in the same layer, and then synchronize the position with 3D objects. As for things like near big, far small, etc., you have to calculate the scale by distance yourself, or leave it alone. The EmitNumbers demo demonstrates how to use 2D UI and 3D objects to synchronize coordinates.
- UIPanel does not have the function of automatically facing the screen. It can be implemented by suspending the script by itself. It is generally possible to use LookAt.
Create UI dynamically
In many cases, you don't need to put the UI interface into the scene. Another common way to create UI objects is:
GComponent view = UIPackage.CreateObject ("package name", "component name").asCom;

    // The following methods can display the view:

    // 1, directly added to GRoot and displayed
    GRoot.inst.AddChild (view);

    // 2, use window display
    aWindow.contentPane = view;
    aWindow.Show ();

    // 3, add to other components
    aComponnent.AddChild (view);
If there is too much content in the interface, it may cause a freeze when creating. FairyGUI provides a way to create the UI asynchronously. Under the asynchronous creation mode, the CPU time consumed by each frame will be controlled, but the creation time will be slightly longer than the synchronous creation. E.g:
   UIPackage.CreateObjectAsync ("package name", "component name", MyCreateObjectCallback);

    void MyCreateObjectCallback (GObject obj)
    {
    }
The dynamically created interface will not be destroyed automatically, such as a backpack window, you do not need to destroy it every time you go through the scene. If you want to destroy the interface, you need to manually call the Dispose method, for example
view.Dispose ();
Occasions and considerations when using UIPanel and UIPackage.CreateObject
UIPanel is the most commonly used 3D UI. He can easily hang the UI on any GameObject. Of course, UIPanel can also be used in 2D UI. His advantage is that it can be placed directly in the scene and conforms to the ECS architecture of Unity. The disadvantage is that this usage brings a lot of trouble to UI management, especially for medium and large games.
Using UIPackage.CreateObject, you can create any interface using code, which can be used in traditional design patterns. Lua support is also very convenient. However, you must be careful about the life cycle of the generated object, because it needs to be manually destroyed explicitly, and you should never hang objects created using CreateObject to some other ordinary GameObject, otherwise those GameObjects will be destroyed in this UI together. GameObject, but this UI is still in normal use, and a null reference error will occur.
Association of GameObject and UI node
Using GObject.displayObject.gameObject, it is easy to get the GameObject corresponding to a UI node; but in some cases, you need to push back to the UI node through GameObject, for example:
- When debugging, I hope to see the UI node information corresponding to the GameObject in the Inspector;
- When doing UI automation testing, for example, when using a UI automation solution such as NetEase AirTest, you need to obtain UI nodes through GameObject.
In order to save memory, FairyGUI does not attach a Mono component that can provide the information of the corresponding UI node to each GameObject by default. Since SDK 3.2.0, you can define a macroFAIRYGUI_TESTTo fulfill these needs. After defining this macro, when you click GameObject in Scene, you can view the content of the Display Object Info component in the inspector:
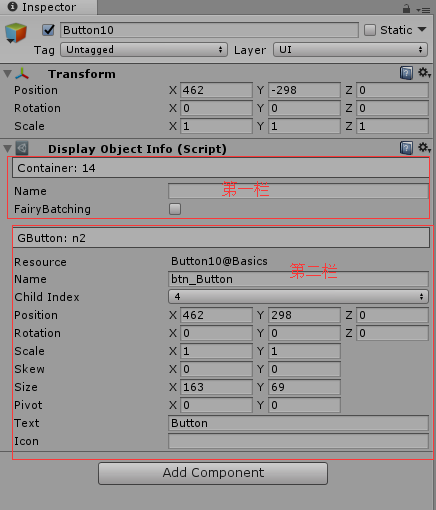
Of course, you can also modify its content here.
Note that a GObject may be composed of multiple GameObjects. If you select a GameObject, only the first column of information and no second column of information appear, indicating that it is not the main GameObject of the UI node.
The following code shows how to get the UI node corresponding to a GameObject and modify its text:
DisplayObjectInfo info = gameObject.GetComponent<DisplayObjectInfo>();

    GObject obj = GRoot.inst.DisplayObjectToGObject(info.displayObject);
    obj.text = "Hello";
Stage Camera
When a UIPanel is added, or when the UI is dynamically created for the first time, a "Stage Camera" is automatically added to the scene. This is the default UI camera. You can also manually add this UI camera to the scene:
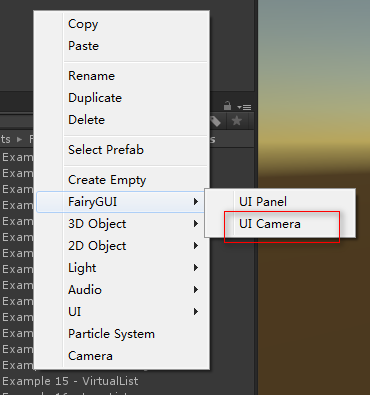
"Stage Camera" generally does not need to modify its properties, except for the following:
Constant SizeWhether to use a fixed camera size. The default is true. This option only affects the scaling of the particle effect. When the value is true, the screen is enlarged or reduced, and the particle effect will also be enlarged and reduced, which is suitable for mobile games. When the value is false, the screen is enlarged or reduced, and the particle effect will not be enlarged and reduced. This applies to PC games.
UIContentScaler
The UIContentScaler component is used to set the adaptation. Just hook up the UIContentScaler component to any GameObject in the startup scene. It is not necessary to hang every scene.Using UIContentScaler has the same effect as using GRoot.inst.setContentScaleFactor, choose one of the methods to set the adaptation.
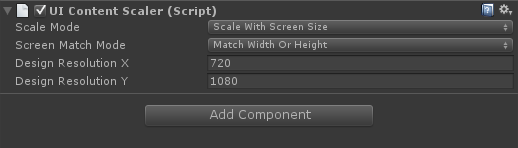
Scale ModeZoom mode.Constant Pixel SizeNo scaling is performed. The UI is rendered 1: 1.Scale With Screen SizeScale according to screen size.Constant Physical SizeNot supported at this time.
Screen Match ModeAdaptation mode. Refer to the description of the API above.Design Resolution XDesign Resolution YInvolves the width and height of the resolution.Ignore OrientationGenerally, when we set a design resolution, FairyGUI will automatically adjust the screen orientation of the design resolution according to the horizontal and vertical screen settings to ensure that the global zoom factor remains the same when the screen is rotated. If you are designing a program on your PC, maybe this feature is not what you need, then you can check this option to turn off this feature.
UIConfig
The UIConfig component is used to set some global parameters. Using the UIConfig component is the same as setting the global parameters in the code using the UIConfig class. However, there is a difference in that the code mode is used to set the edit mode, and the correct effect is not seen. For example, if you use UIConfig.defaultFont to set the default font, the font effect displayed by the UIPanel in the edit mode is incorrect, and only after running. The solution is to use UIConfig components. Select any object in the scene, hang the UIConfig component, and modify the corresponding options.
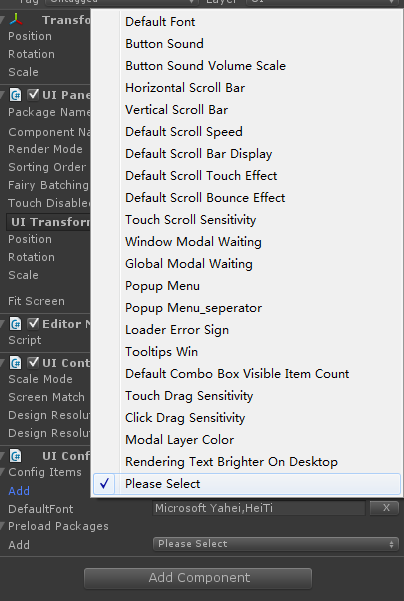
UIConfig component can also load packages, clickPreload PackagesAdd below.